boomie’s kitchen has officially launched our Facebook page. Like us on Facebook to receive updates and interact with the community!


boomie’s kitchen has officially launched our Facebook page. Like us on Facebook to receive updates and interact with the community!

Every once in a while my little sister comes across a recipe I find slightly questionable, disregards my opinion, and makes me go through with it. This Sriracha-soy fried chicken definitely started that way. They also started in high school, where my kitchen was more limited, ironically, than it is now in college. It was a time where experimentation was overruled by tradition, and frying was definitely out of the question.
We still made it happen. Granted my aunt and uncle weren’t too happy about frying things… it happened. Although originally taken from a old issue of Bon Appétit that was randomly laying around the house, this was one of the few recipes that I’ve actively taken time out of my day to find (googling fried chicken recipes probably wasn’t my best move ever).

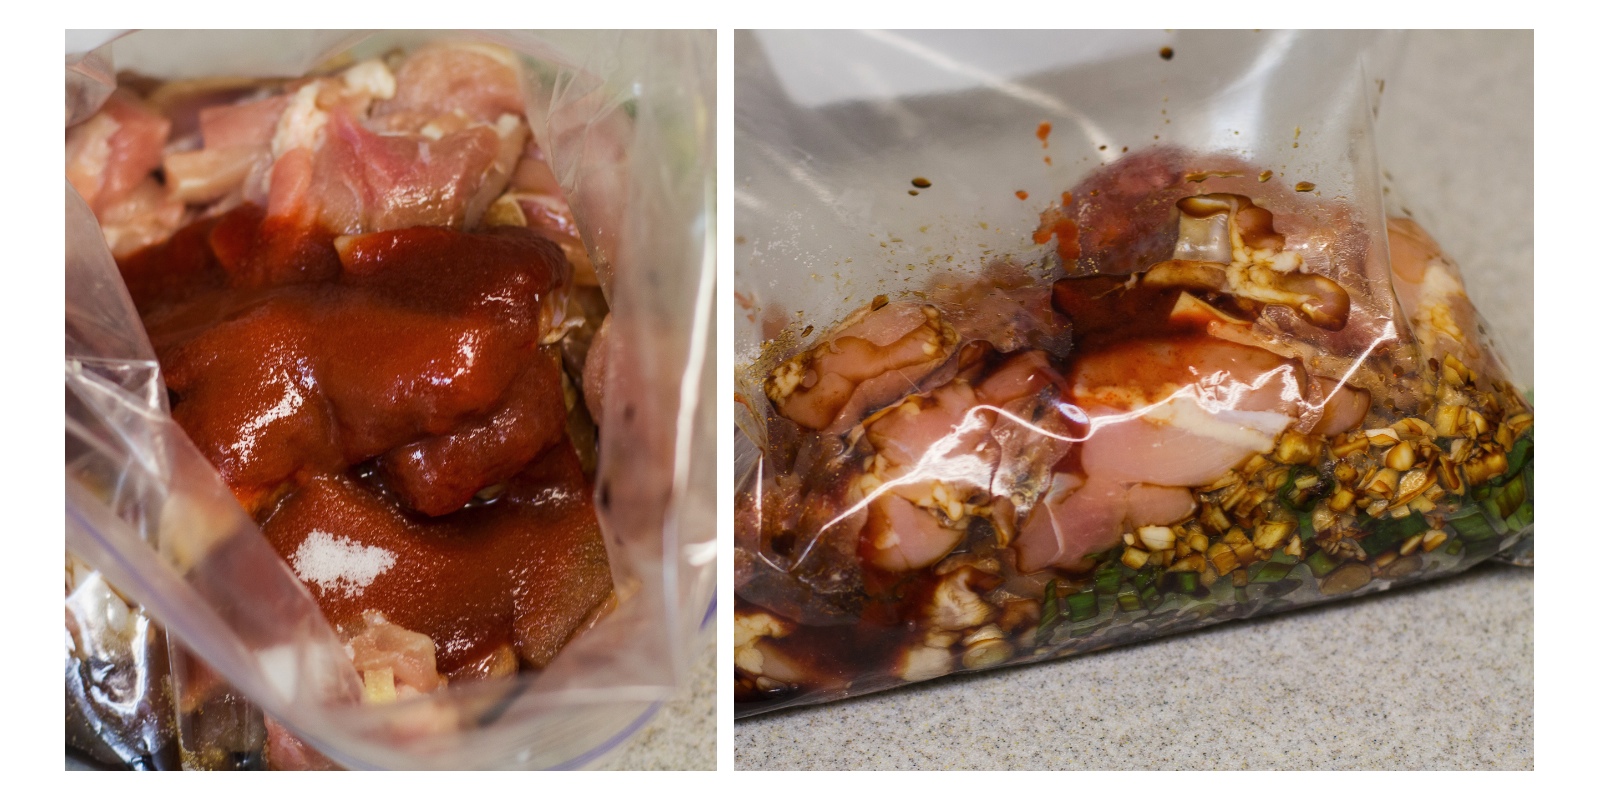
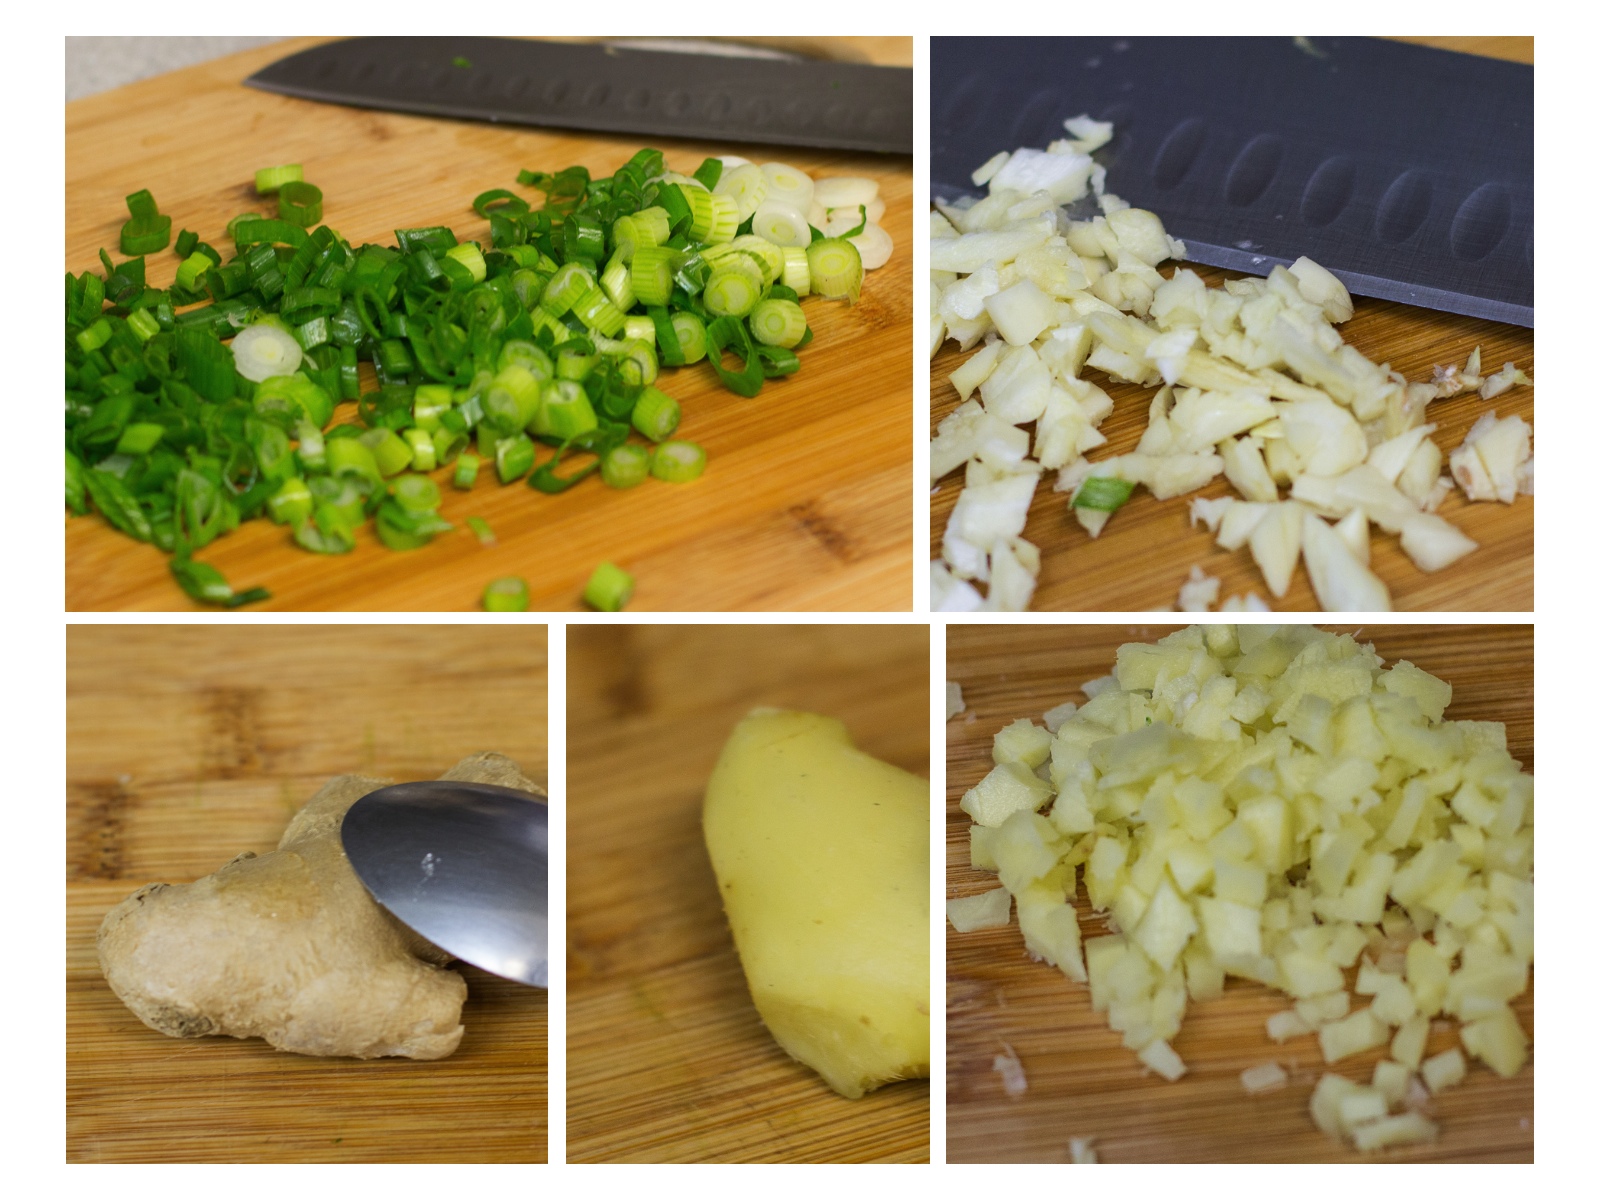
This fried chicken is marinaded in Sriracha and soy sauce which gives it a rich asian inspired flavor. Added to the marinade is ginger, garlic, and green onions which helps cut down the meaty flavor of chicken and provide a hint of warmth to the chicken pieces. To make dealing with raw chicken (and dealing with marinade in general) a lot easier, the chicken and marinade ingredients were thrown into a freezer ziplock bag, zipped up, and massaged gently until everything was combined. Instead of dredging in flour, egg and bread crumbs like my chicken katsu, the chicken is simply coated in potato starch, the secret to asian popcorn chicken. The result is a moist, succulent fried chicken that is crispy and slightly flakey on the outside but moist and tender on the inside.


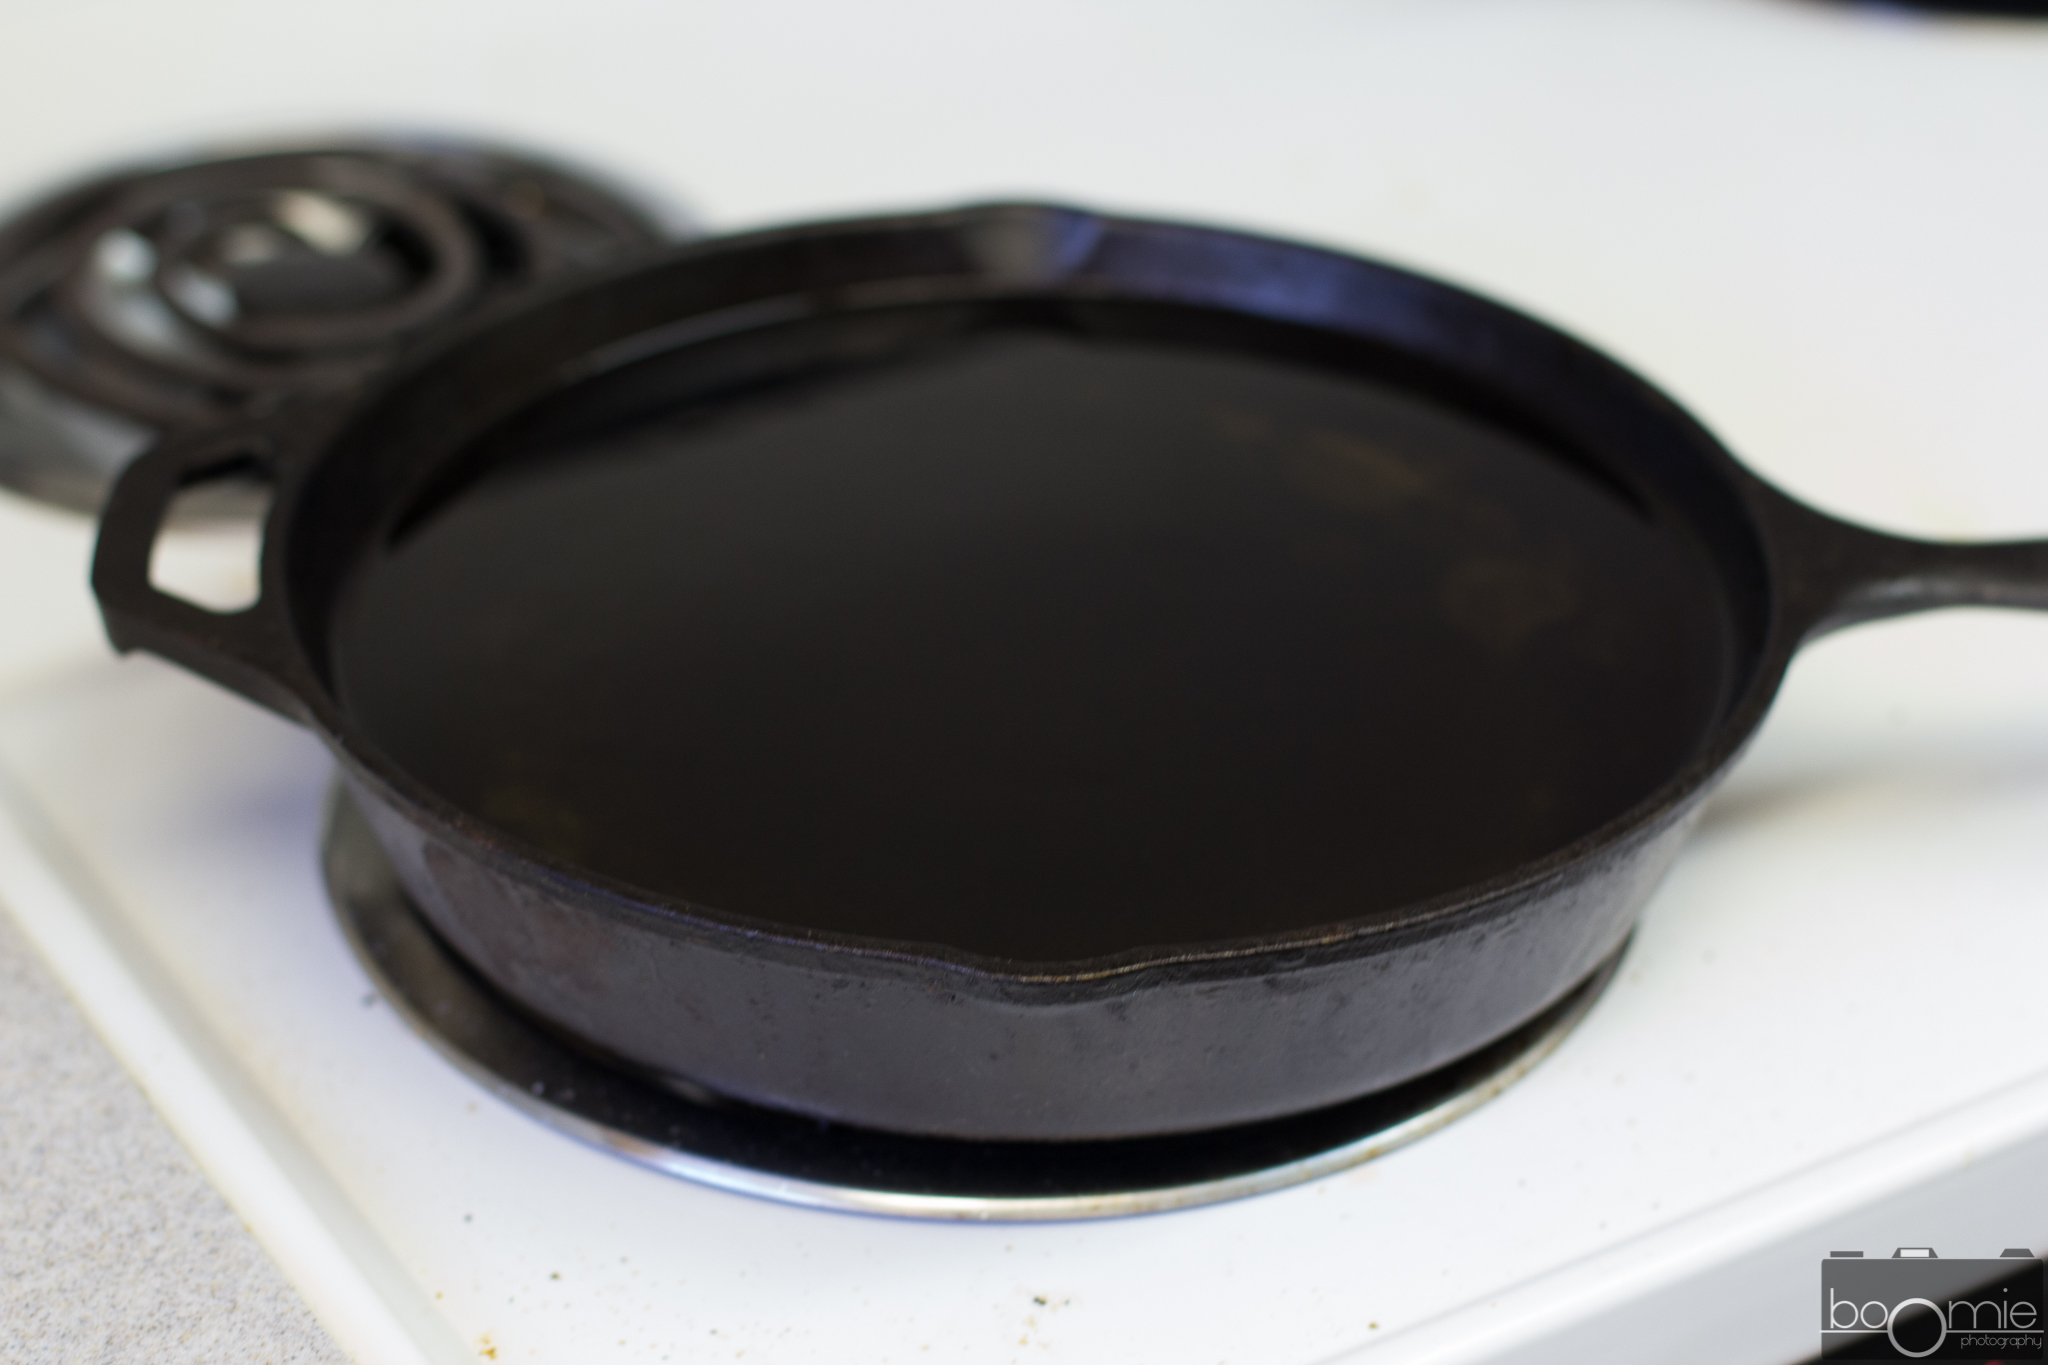
Since the recipe uses chicken thigh, frying this was a lot easier than frying drumsticks. I was able to use my handy cast-iron skillet to heat up the oil and fry the chicken. Although this required me to monitor the oil more frequently throughout the process, it wasn’t too difficult and I definitely encourage you to give this a try even if you’ve never fried before. Remember when frying to leave at least an inch from the top to account for oil splattering and to never crowd the pan by adding too much chicken. If too much chicken is added at once, the oil temperature drops too quickly and cold oil will make the crust soggy.

To serve this as an appetizer or finger food, serve the fried chicken on romaine lettuce leaves and garnish with some radish, mint and cilantro. I ended up serving this as an entree by serving it as is with other sides. Every time since I’ve made the fried chicken, Michelle has made me prepare this fried chicken for her. In fact, my friends enjoyed this so much the first time I made these, I ended up making a double batch fried each batch right before I was going to serve them. Although I don’t necessarily share Michelle’s overwhelming passion for fried chicken, you might! Give this a try and let me know how it goes!

Adapted from Bon Appétit

 As my previous post suggests, I’m currently going through finals week. My last finals week before I begin my last year of college. But to me, that also means that its a prime time for me to start random projects. Or test recipes that I’ve always wanted to. In this case, it was both! Since its graduation season here on campus, senior portraits are happening and requests for photographs have begun. I decided to shoot two birds with one stone, and splurge a bit as a method of retail therapy to purchase some new shooting gear. More excitingly, I also discovered about 18 pounds of chicken laying in my freezer.. so here we go with that…


I have the world’s best mentor. Her name is Heather Belk. She is the Director of AS Administration at our school, loved by basically everyone who meets her, and is teaching me the ins and outs of student affairs to get me ready. But aside from dealing with a couple hundred of crazy college students, she’s also a wife and amazing chef. Seriously people, I don’t know how she does it. Literally, the best. Not only did she introduced me to slow cooker chicken and help me figure out what to do with this ridiculous amount of chicken, she also inspired me to use my slow cooker more.

This recipe is a result of that. Heather introduced me to a slow cooker recipe (which I can’t wait to share with all of you as soon as I get pictures taken) which lead me to finally getting around to make chicken tortilla soup, one of my staples at any mexican restaurant. Although I do enjoy refusing to engage in any finals-related festivities, I do recognize that I must occasionally indulge myself in my studies. That being said, a slow cooker version of the soup was in place!


This is one of those recipes where you just throw everything in a pot, cross you fingers, walk away and hope it turns out ok. Quite honestly, I’m glad I did walk away since I started this at 4 in the morning, but with over 4000 ratings at 4.5 half stars on allrecipies.com, I doubted anything could go wrong. When I woke up the next day for a brunch, my nose and soon my stomach told me that I was indeed correct.

What I love about this recipe, is how hard it is for someone to mess up. Honestly, throw everything in a pot, and walk away for 8 hours. Feel free to include a bag of frozen corn, a can of drained black beans, or make any modifications you’d like. I’ve made this soup twice already, and both times it was quite delightful. I do caution against cooking the rice with the soup since it turned into chicken tortilla porridge the last time I tried that.
Try it out and let me know what modifications you decide to make!
Adapted from Allrecipes.com


Finals week suck. If you’re an undergrad somewhere out there, you get it. Its a week where people have an excuse to eat all the junk food they want, not shower for a few days, and show up to the library in sweats. To be completely honest, I personally avoid the library on our campus not because of how packed it is (which it is) but because of how bad it smells.

But then, finals end – people rejoice, the sky is blue again, and the air is, once again, breathable. I have a horrible finals week. Absolutely horrible. I’m seriously going to hate every second of it. So of course, I in the middle of this chaos I had to run home and bake something new. It helped that my friend entertained me on the guitar while this happened…

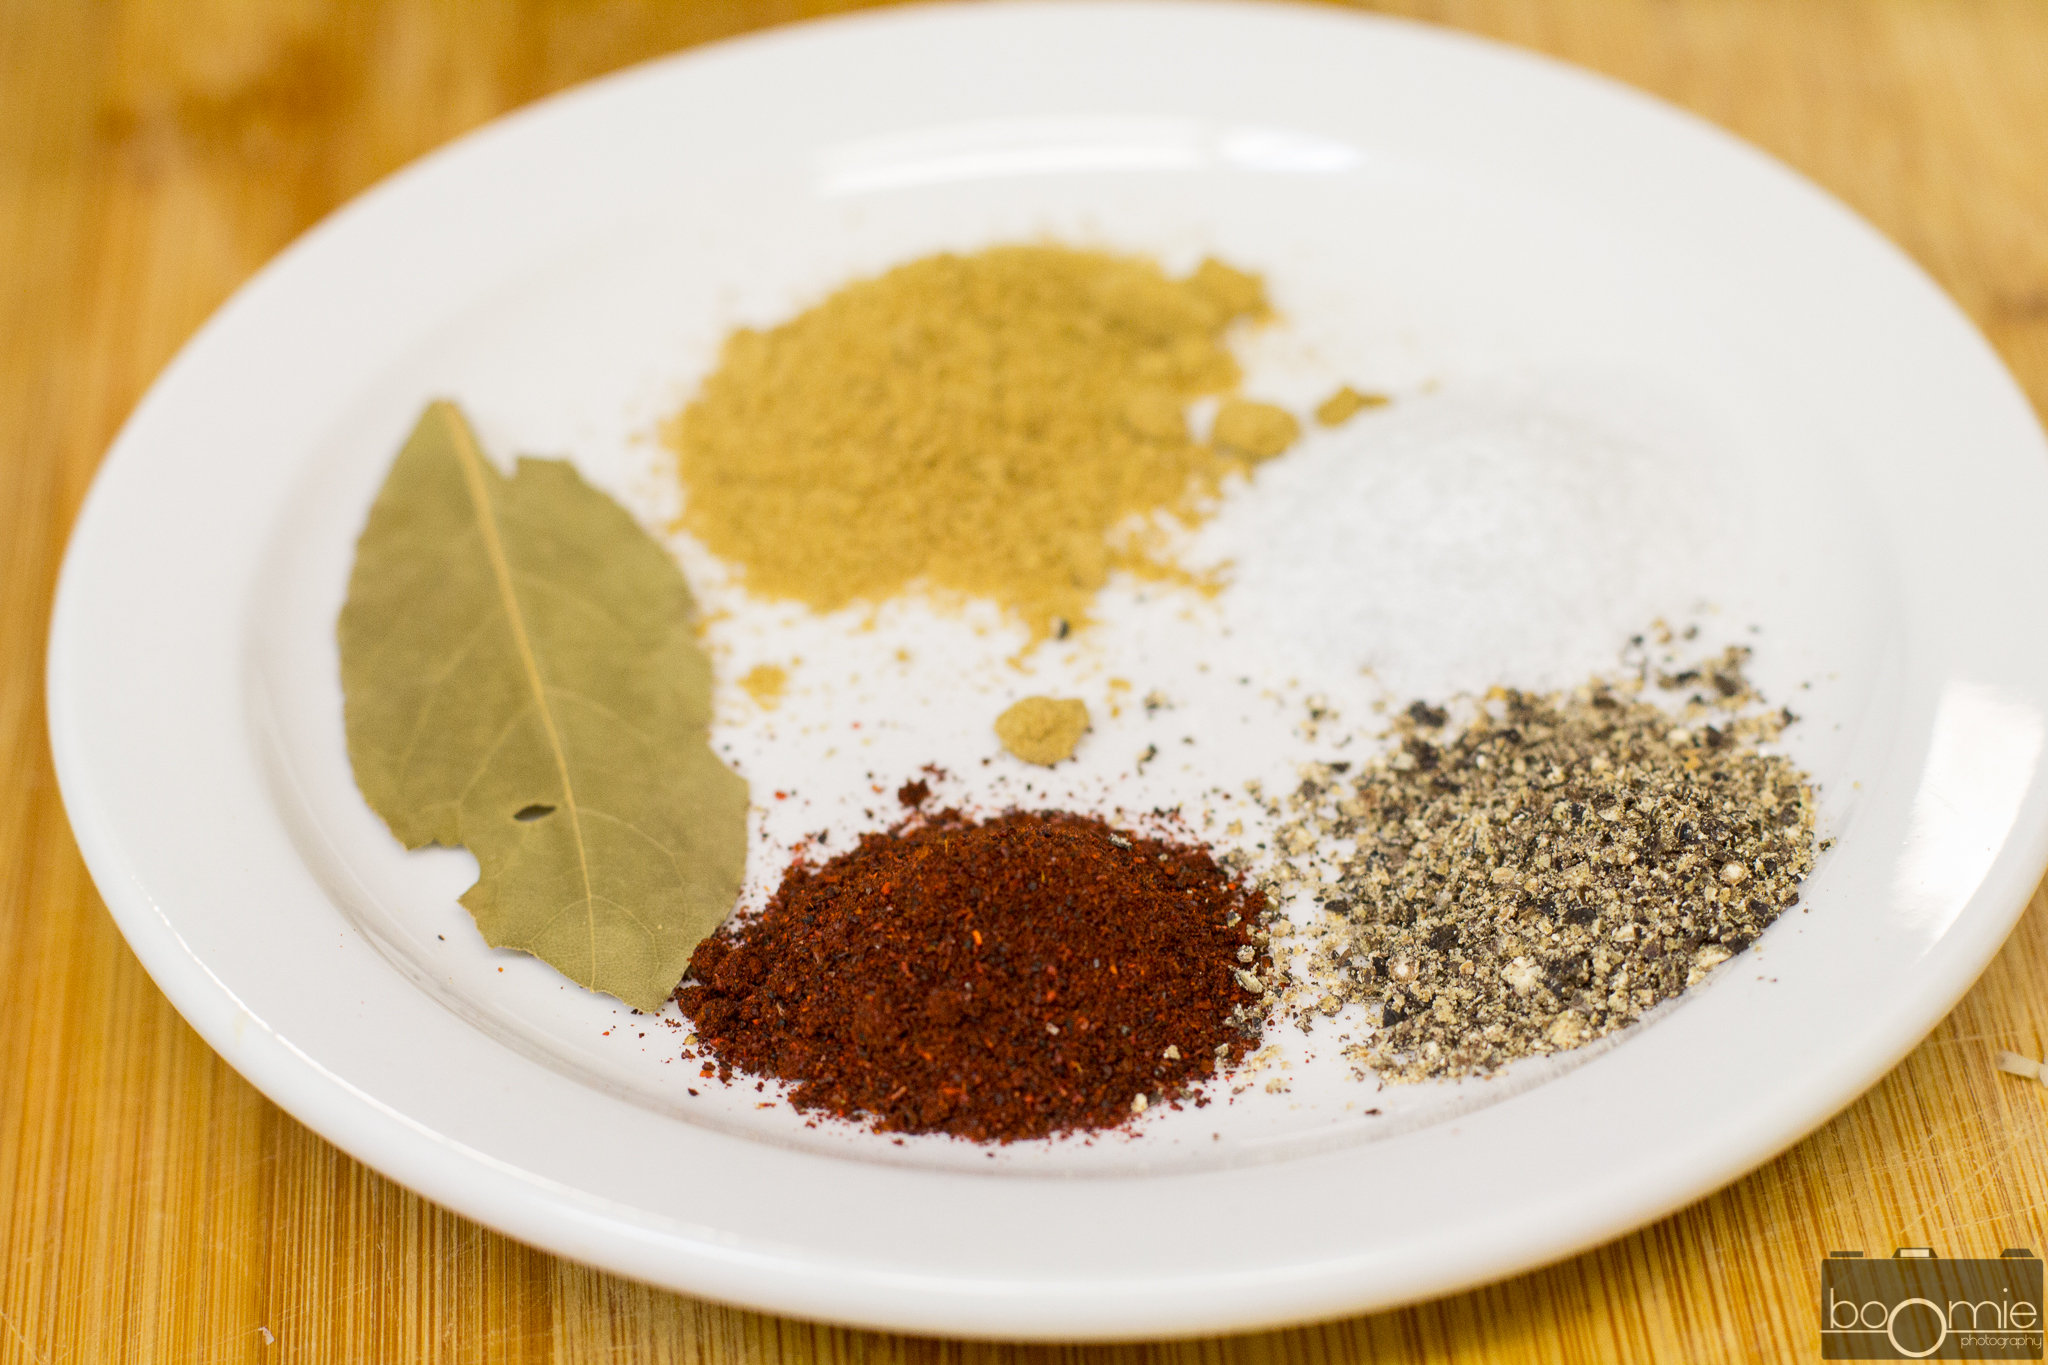
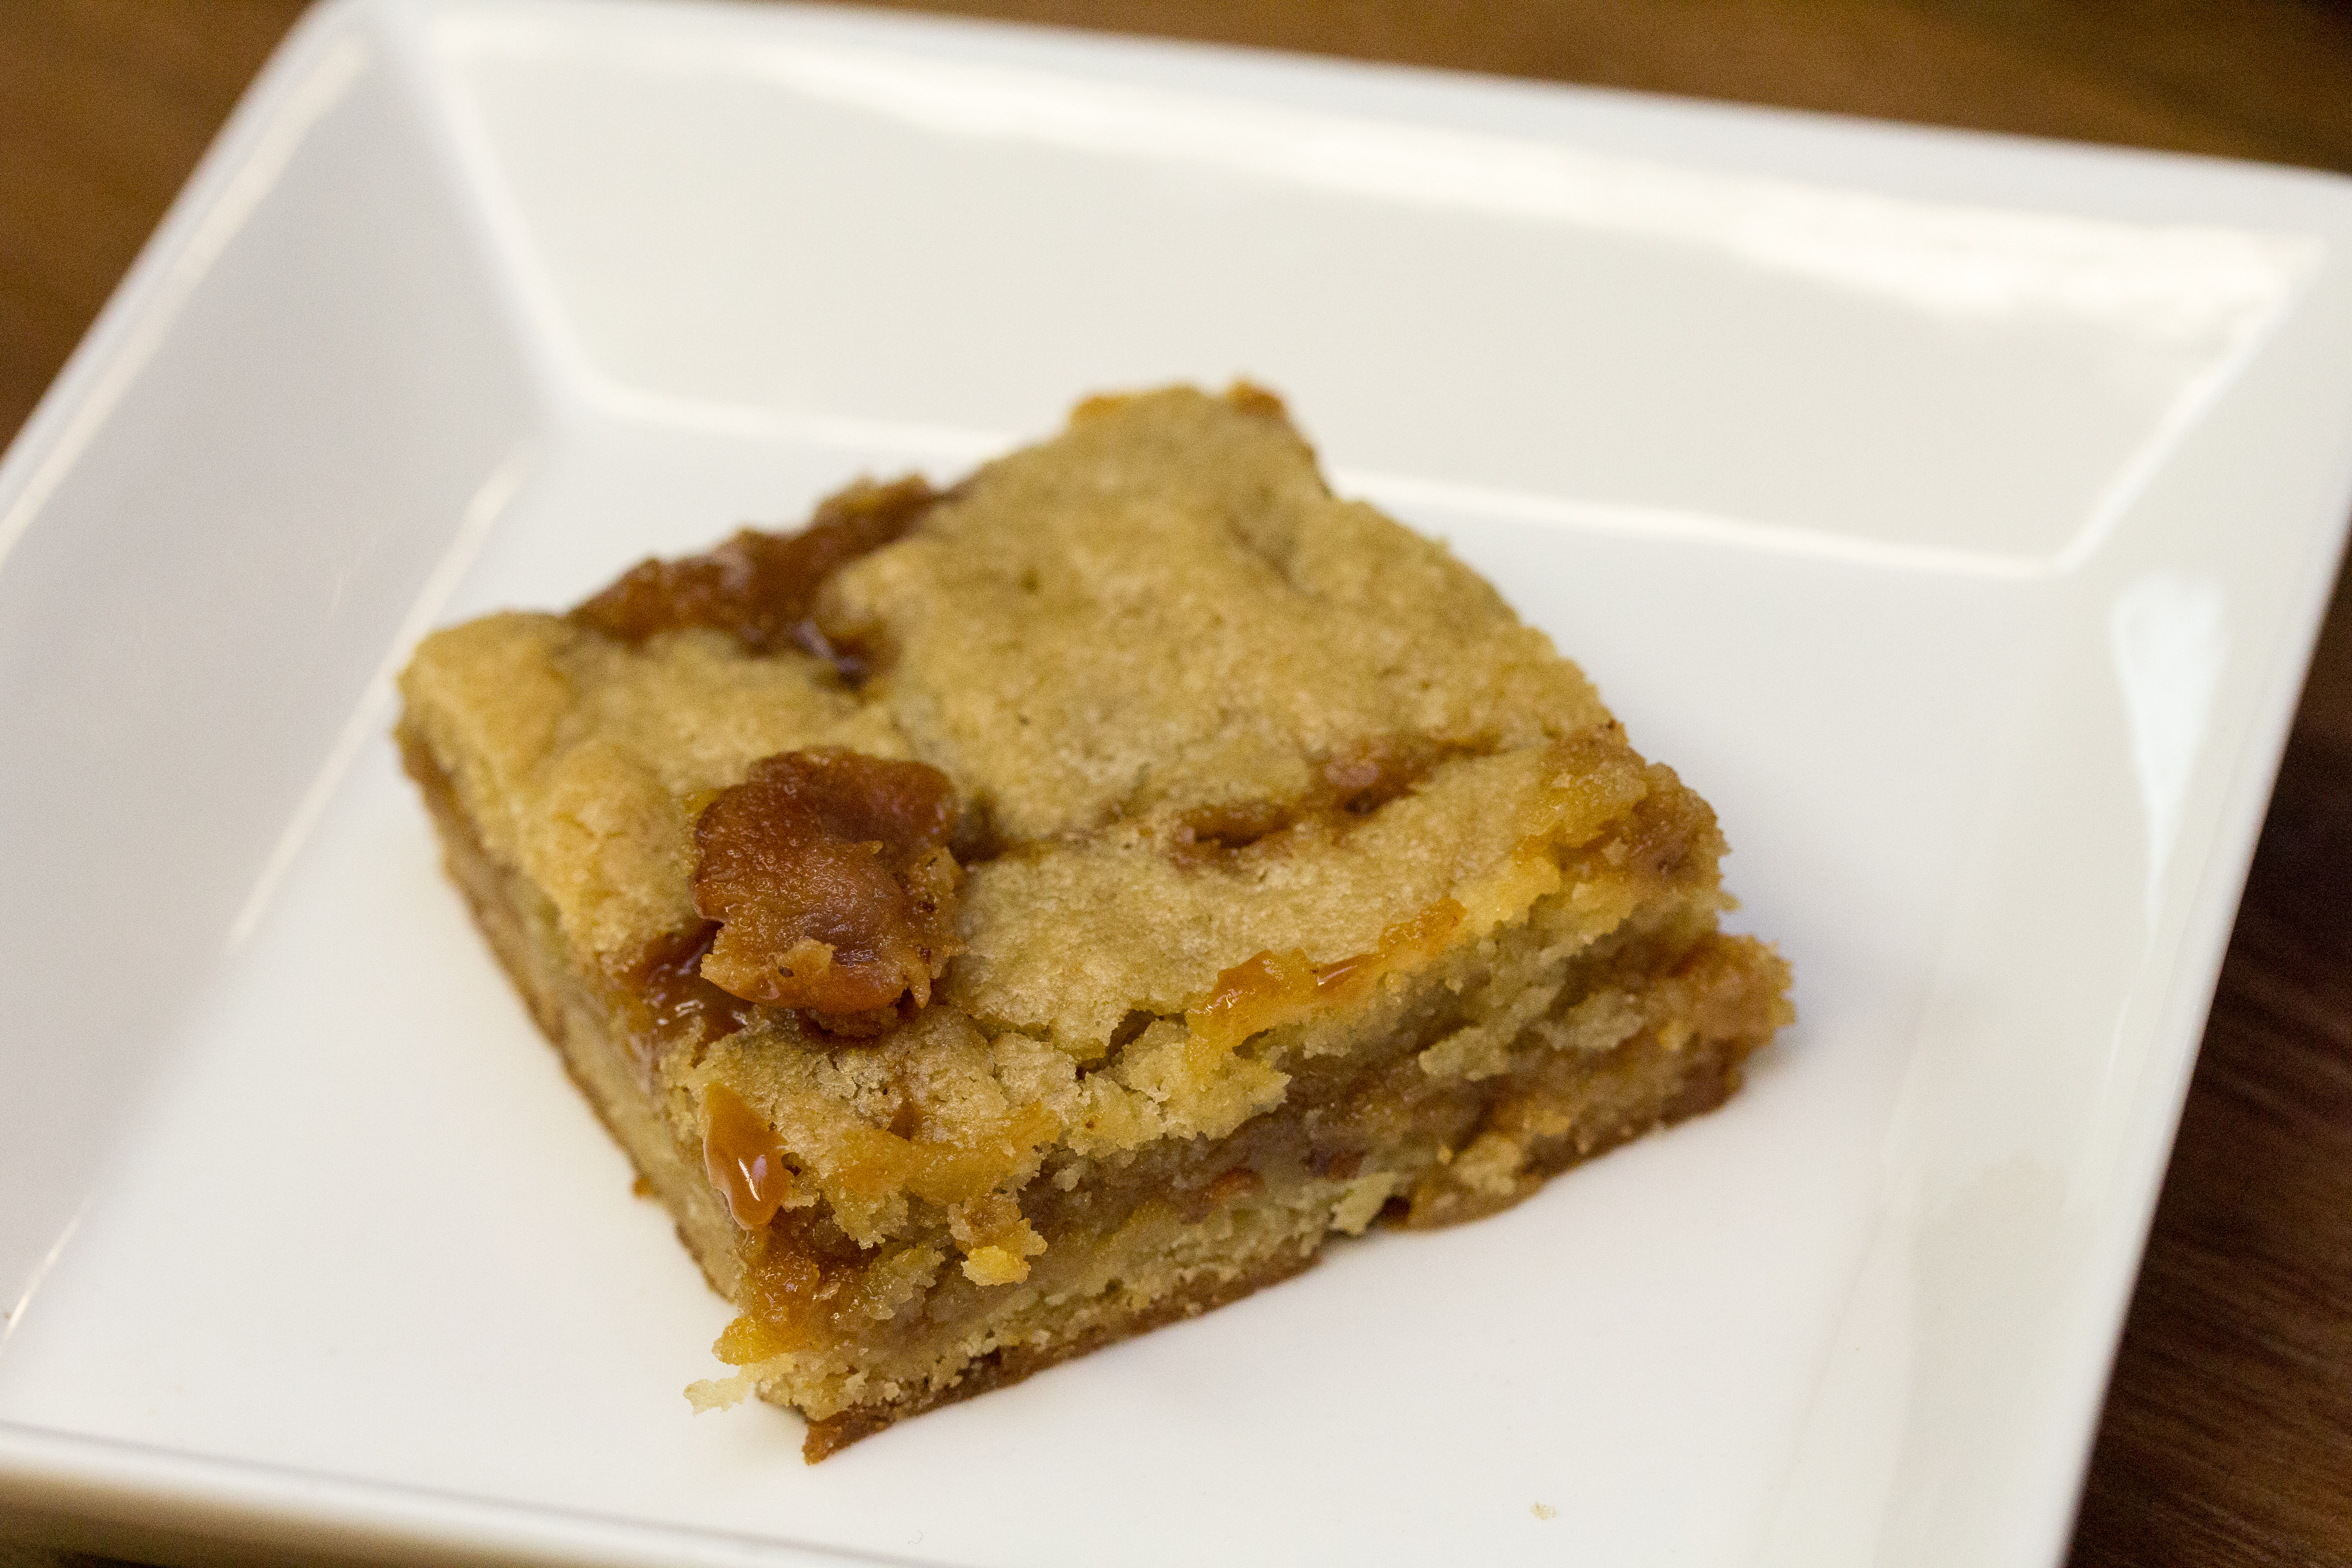
Blondies aren’t a new concept here at boomie’s kitchen. I’ve done with with salted caramel, and I’ve done one with peanut butter. But these blondies are different. The salted caramel makes the blondies chewy but the batter used is moist, dense, and tender. The bacon adds another dimension to the flavor profile by enhancing the sweet and salty profile with savory and smokey notes.


The recipe is simple. The most time consuming portion was frying the bacon and the most difficult part was making the salted caramel sauce. I saved some time by frying the bacon in one pan and starting the salted caramel next to it. Of course, you can leave the bacon out and this recipe will work just fine (I’ve done it before!). You can probably also use store bought salted caramel sauce but challenge yourself to make some caramel, its fun and rewarding, I promise!

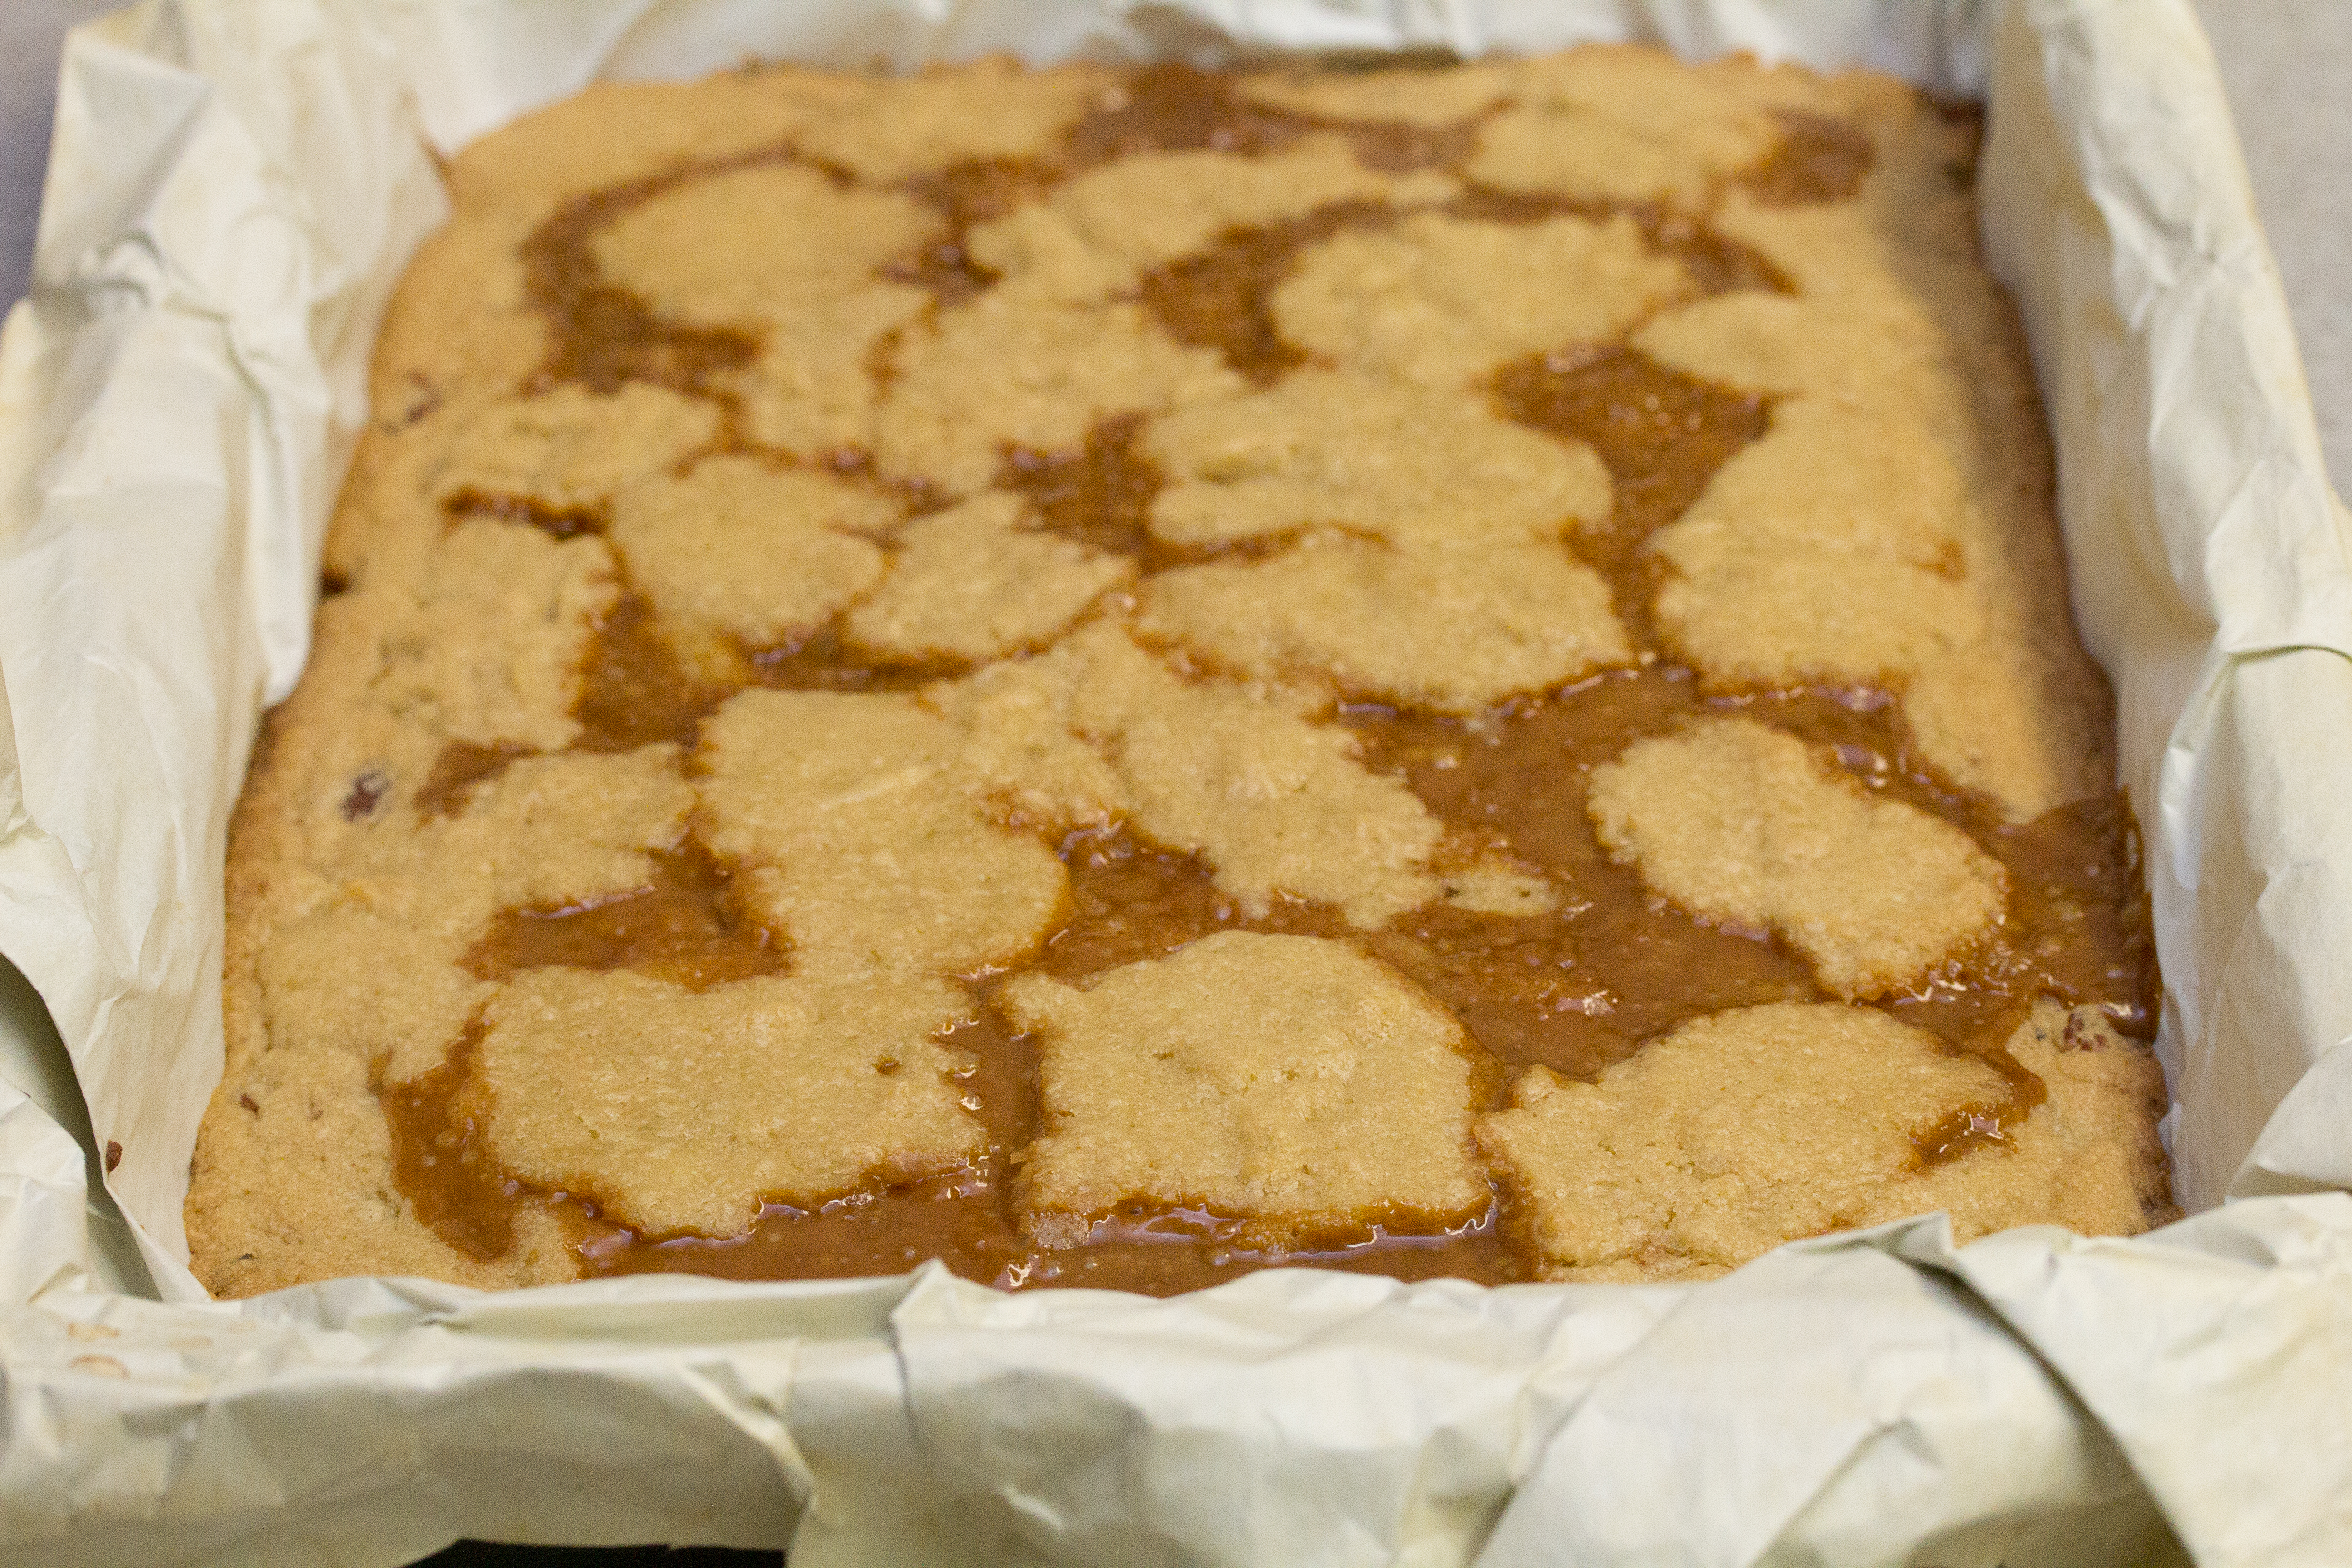
These bars look especially pretty with the lattice like topping. This is done by dropping spoonfuls of dough all over the batter. When you’re doing this don’t be too precise and don’t worry if it seems like theres not enough batter – it’ll work out! To serve, I recommend waiting until they completely cool or the caramel won’t have set yet which will lead to the top layer to move around when you cut it. I used a chef’s knife with a light spritz of pam to help me cut them and I was able to get perfect edges.

I’m pleased to announce that boomie’s kitchen has just purchased the domain of boomieskitchen.com. This should go into effect by March 22,2013 at which point any previous links will be directed to our new domain.
Please share this new link with your friends and family!
 It’s been a while since I’ve had a chance to write something… four months to be exact. Four months of time before I’ve really had a chance to write something for myself, to do something for myself. School has been crazy this past quarter. I have finals in a few days, but of course I decide to do better things with my time like prepare for St Patricks Day.

Spring is one of the 4 seasons that I have mixed feelings about. It signals the end of my favorite winter. The obnoxious amounts of Fall spices, warm stews, and peppermint. It does, however, let me make these cutesy powdery colored foods. Yes I used the word cutesy. Yes that is a word.
I’m usually not shy with my food coloring. But I decided to let the green tea shine in this recipe. Before you moan and cringe at the use of green tea powder, stay and hear me out before you move on… Green tea powder isn’t cheap. Well, technically matcha powered (what green tea powder traditionally refers to) isn’t cheap. When you’re working with baked goods, the high quality matcha power isn’t necessary. Refined flavors of the high quality matcha can be lost in the almond or other flavors of baked goods. In addition, the antioxidants and other valuable nutritions are a lot higher in the green tea powder instead of in the Matcha powder. I found mine online if you wanted a reference.
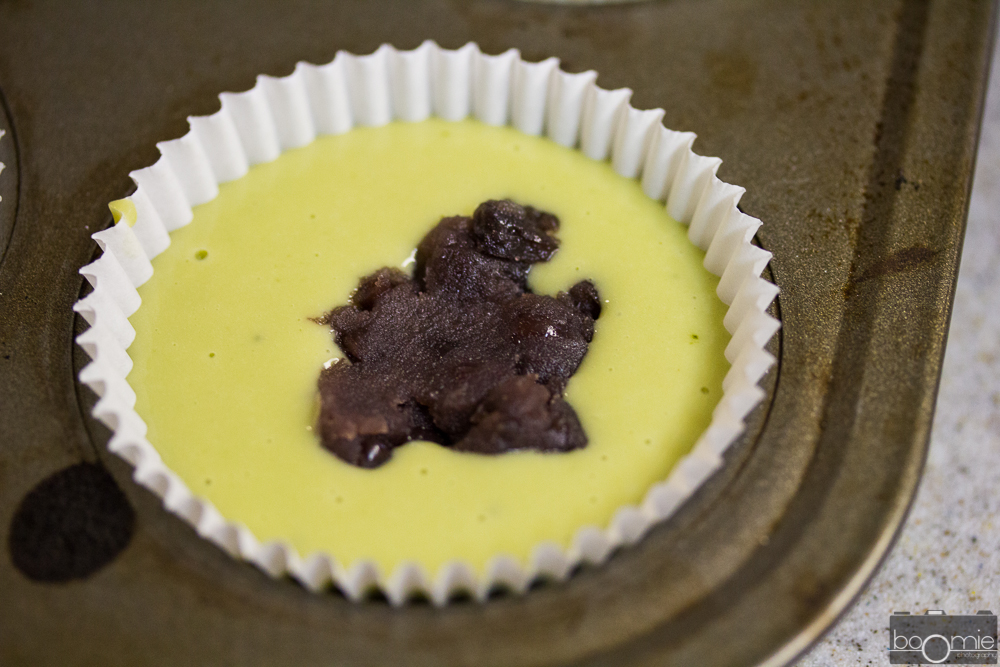
I’m not going to lie. I was originally going to hash out a green tea macaron recipe. Then, I stumbled upon these babies in the middle of the night, when I feel the most whimsical. I also needed an excuse to use the glutinous rice powder and red beans I had in the pantry and green tea powder I just bought for macarons. The original recipe didn’t have any red beans, but I wanted to spice things up a little.

If you’re wondering where to get glutinous rice powder, you can get the more popular Mochiko powder. I used the plastic pouches that you can find in most Asian super markets where the grains are. They were conveniently located in the same isle as red beans where I shop!
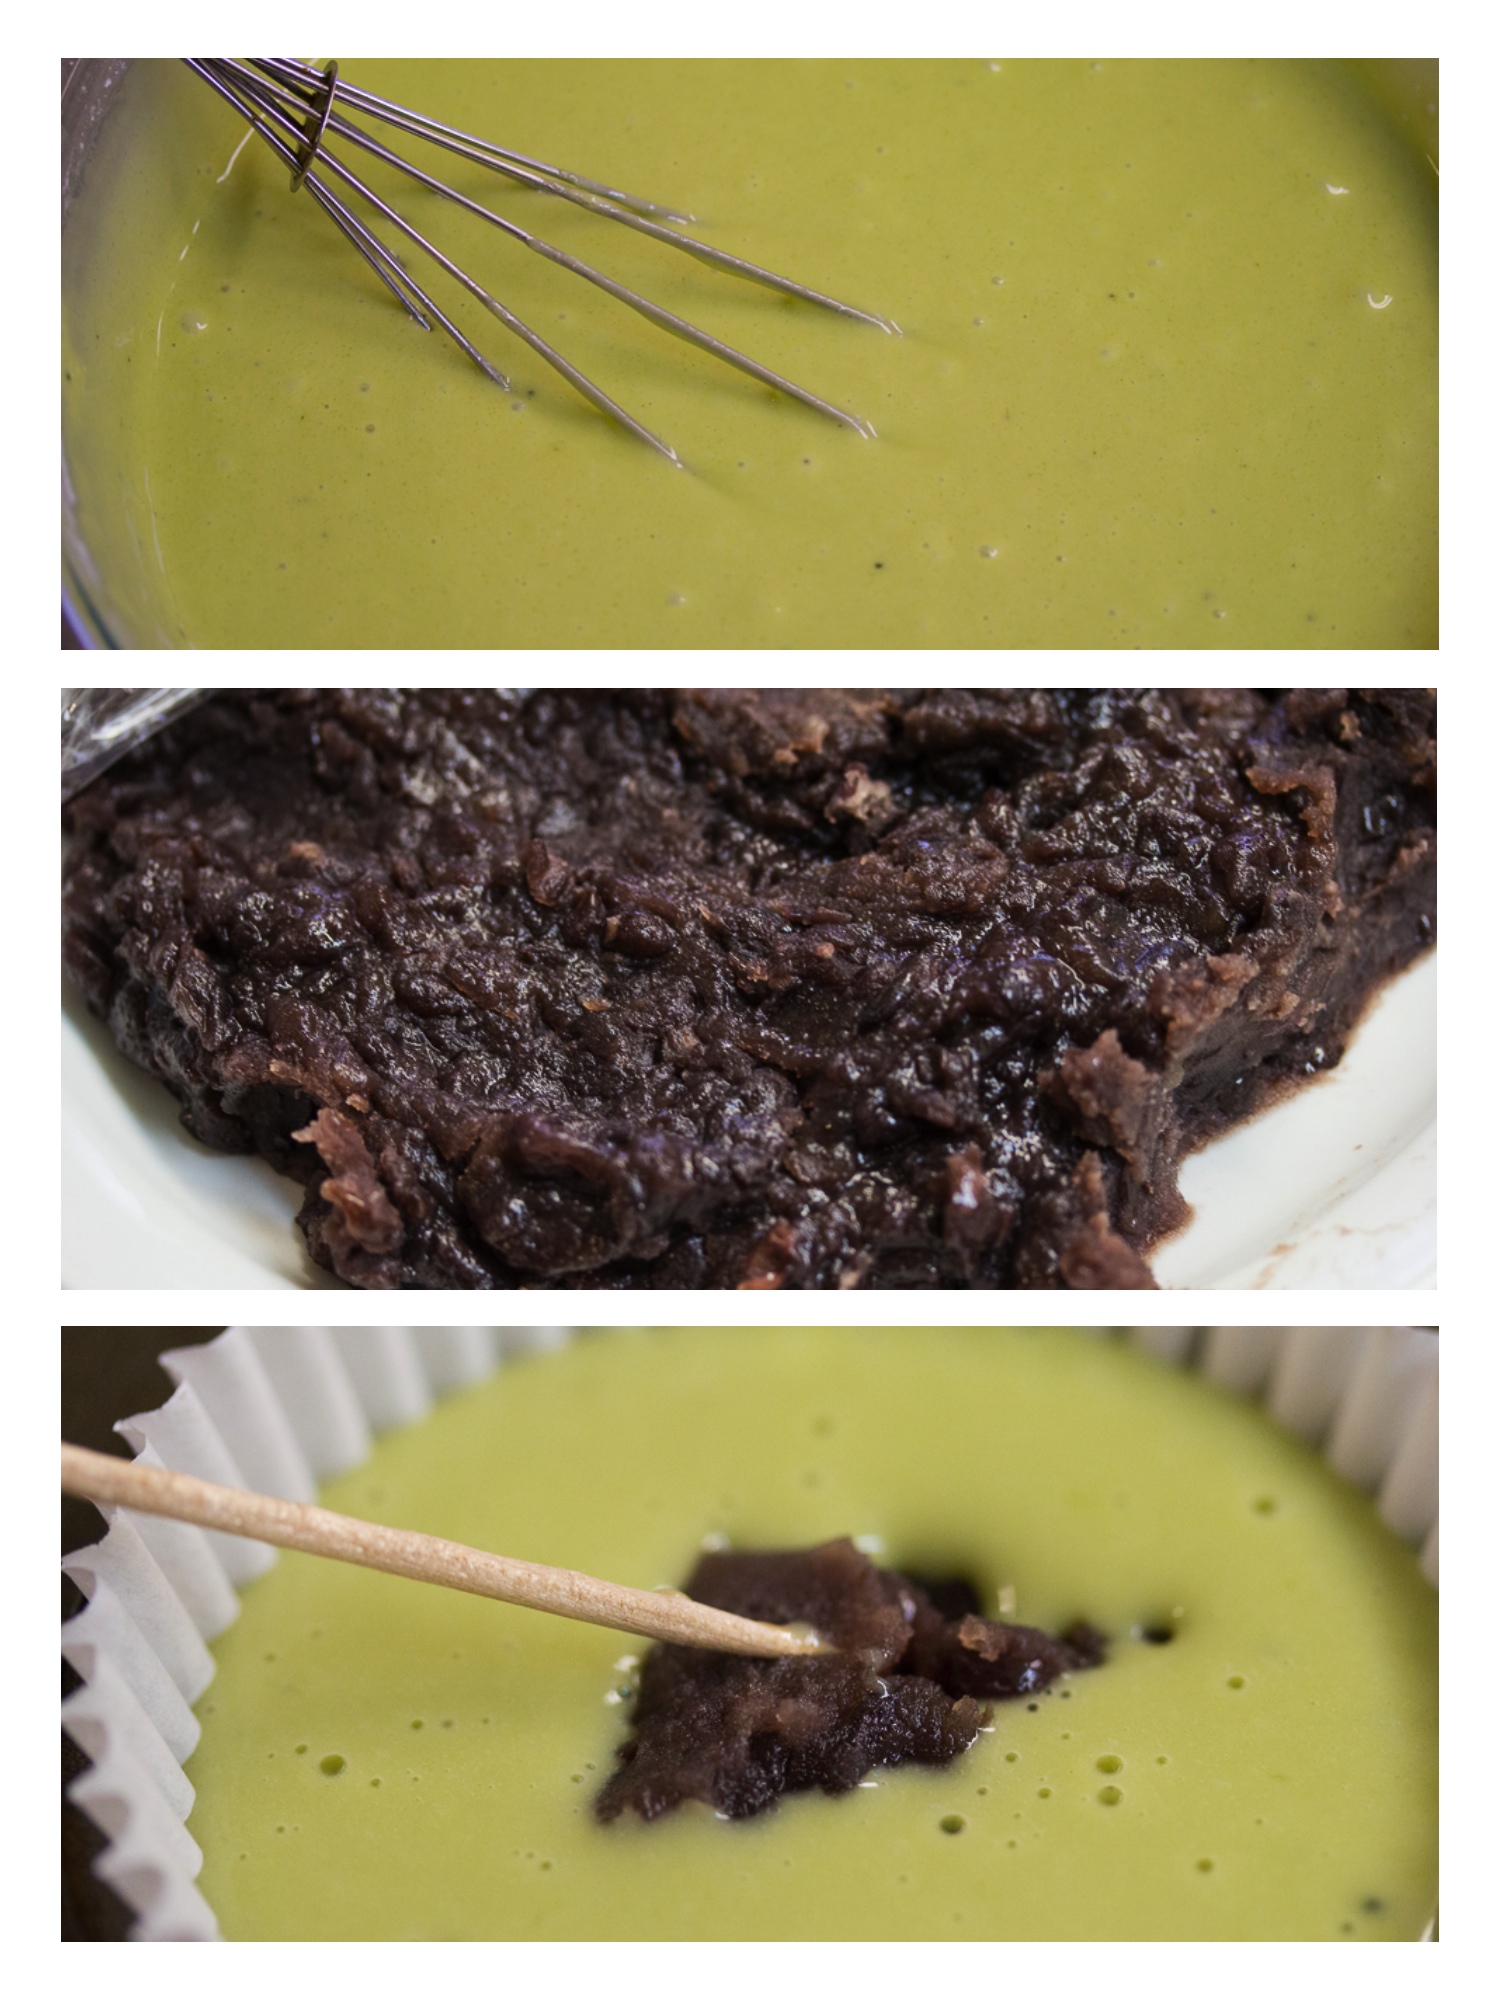
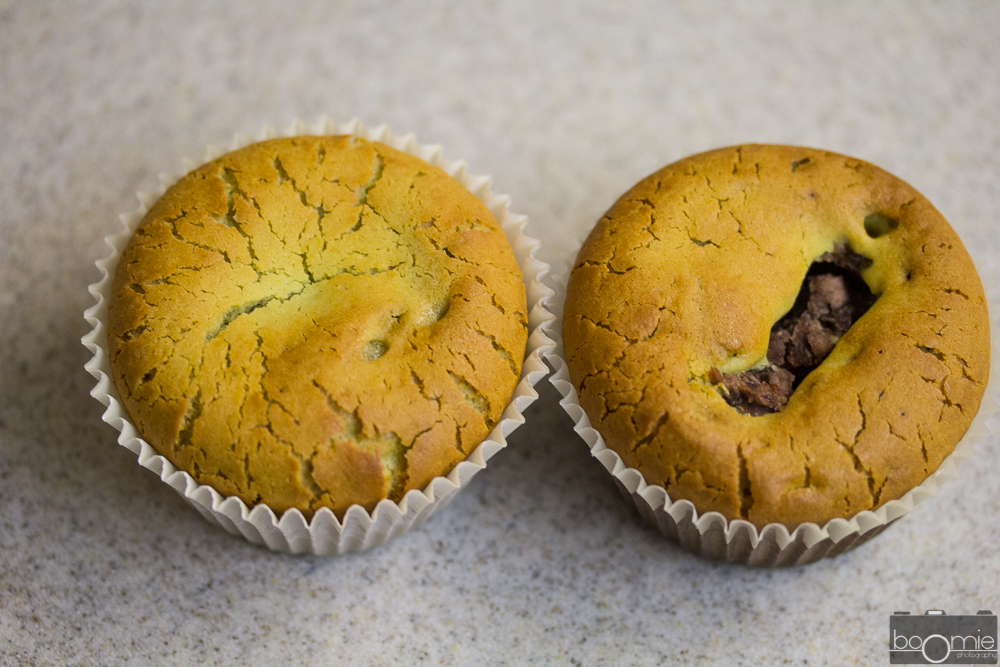
The cupcakes are easy to make. You combine the dry ingredients in a bowl, combine the wet ingredients and whisk to combine. The entire process, including pictures, took me about 20 minutes. Don’t fret if your dry ingredients look a bit white, it darkens up when the wet ingredients are added in.
I made the red bean paste because I needed an excuse to make red bean paste. I ate about a fourth of what I made, and use the rest in these cupcakes. I used a tooth pick to help push down the little red bean paste disks I made with my hands, the paste doesn’t stick at all. That recipe, however, will have to be saved for another day!
Originally from Humble Bean

 For those of you slackers (guilty as well here) and still need an ideas for Thanksgiving, check out the recipes that I made last year. This is for all of you who are a bit slow and those of you who suddenly don’t have Thanksgiving plans anymore. Just kidding! I’m actually still finalizing thanksgiving plans myself; my original anticipation to use this menu didn’t really work out given that rapid growth in Thanksgiving plans.
This year, Thanksgiving came a few weeks early for my friends. I was eager to test out some recipes, and work out a 6 hour plan to get Thanksgiving dinner ready and on the table. So this year, I present to you a thanksgiving dinner, with a turkey, 3 side dishes, and dessert for a smaller family of 5 or 6 in under 6 hours.

For the purpose of this post I couldn’t get cranberries. In fact, people from my local market kind of judged me when I told them what I was doing. I ended up cooking some crushed cranberry sauce in a pan with orange juice, ginger, and lemon juice. A recipe will be coming soon though!
Before I get into the “action plan” here is a list of recipes that I’ve posted that I will be using in this 6 hour plan.
This is the exact menu that I prepared for my friends last thanksgiving. Here’s the action plan:
1:00 PM make the pie
2:00 PM prep mashed potatoes, do not bake them
3:00 PM begin prep work for the stuffing
4:00 PM prepare turkey
4:40 PM start baking turkey, finish stuffing and prepare for baking
5:00 PM start baking stuffing
6:40 PM baked potatoes while turkey is resting
7 PM Dinner is served
This year I will be trying a few new things for Thanksgiving. I’m excited to be able to share these recipes with you when I do finish everything. I wish all of you the best Thanksgiving yet, I hope my recipes will be able to strike some inspiration. Eat fast because Black Friday starts as early as 9 PM at Target this year!

During Thanksgiving, the family always looks forward to that big, juicy, 20 pound bird that always takes over the center of the dinner table. For the chefs, however, the turkey can quickly turn into a nightmare.
Dry. Bland. Still Frozen… Did I mention dry and bland? Let’s not forget about the fact that the thing is 20 pounds…

There are so many ways that the star of Thanksgiving could be ruined. Growing up with a family of 3, my grandparents resented buying a turkey just because of how unrealistic it is for us to finish the bird. Regardless, was always a turkey on the dinner table every Thanksgiving.

Things changed in college. There was no human way I could prepare a giant turkey in my college dorm kitchen, which is why I turned to turkey breasts. I’m not talking about the packaged turkey breast fillets cut off… but the bone-in stuff… At an average of 7 pounds, the turkey breast is perfect for a smaller audience and still delivers the delicious dose of tryptophan sending you into a heavenly turkey-coma right before black friday.

So onto this bird that I’m dying to share with you…it consists of a herby butter that is massaged directly onto the meat, under the skin, which is then roasted gently until it reaches perfection.
A secret for tender and moist that I abide by is the USDA Food Safety and Inspection Service’s Poultry Curve. Alton Brown was actually the chef that introduced this curve to me. We are normally told that chicken has to be cooked until it reaches 165 F internally. In reality, when the turkey is resting, the outside of the turkey continues to warm the inside of it up, so we really only have to wait until 161F for safe cooking!

You honestly don’t really need gravy with this turkey but I’ve included a simple recipe that uses pan-drippings, roux, and a little bit of chicken stock that’ll get you through. I personally love gravy so I make a bowl even though I don’t really need it. I try to find something to do with it.. and yes that is my reference to a post-thanksgiving dinner dish (:

If you are using this gravy recipe for a turkey that you brined, use the lowest-sodium chicken broth you can find or even consider thinning it out with a bit of water instead of chicken broth so its not too salty.
Happy Turkey Day!


My first encounter with mashed potatoes was when I was about 5 years old. It came in a box, with multiple little cup-a-noodle-like cups. I loved the the idea that pouring hot water on salty flakes would transform them in flavorful clouds. But of course, these really weren’t mashed potatoes. I was ok with that.
It took me a while to understand how a potato could possibly become flakes. Then it was slighlty mind blowing to realize that you actually mashed potatoes. You’d think I was a slow kid… but I still managed UCSD somehow…

This is my secret mashed potato recipe. Its really not that big of a secret, but it is pretty legendary. It starts with potatoes boiling on a pot. Bacon is then lightly cooked, until an irresistible golden brown. Once the potatoes are soft, they are drained and mashed. The bacon, and all of its grease (and some more butter when I’m feeling naughty) is added in. I then add in cheese, a dash of salt and pepper.

After being transferred to a greased baking dish (lined with foil of course), its sprinkled with bread crumbs and more cheese. My favorite part about this is the fact that this can be prepared early in the morning before everything else and then baked right before dinner begins while the turkey is resting.

Along with the Stuffing this is one of those recipes that is enjoyed by the entire family. I’ve made this for thanksgiving 4 years in a row now, and 2 more times during christmas. Honestly, you can’t go wrong with this. In fact, this `will be my only recipe that is not changing this holiday season.

Adapted from Foodnetwork.com
Ingredients
Directions


It’s hard to get everyone on the same page on Thanksgiving. I mean… for some people its hard enough trying to prevent the room from blowing off.
Imagine 15 people sitting around a dinner table, expecting a delicious meal put together by 1 person, each nit-picky and not accustomed to Western flavor profile. That is my family.

What I love about stuffing, and specifically this stuffing, is that there is a little bit of something for everyone at the table. My uncle loves the chestnuts, my aunt loves the vegetables, the older sibling you never really wanted (yes, I’m talking about you Peter) can’t stop picking at the bacon – this is my “one dish” that everyone loves, that is always requested.

I started the recipe by removed the extra used in the dish and relied on bacon grease. Because pancetta was difficult to find, I sautéed the vegetables in the bacon grease. From that point forward, it’s just a matter of combining all the remaining ingredients until well combined and forming a delicious bowl of stuffing.

I’m often asked why I don’t stuff my turkey instead of serving it on the side. To be quite honest, it started because my aunt was usually in charge of the turkey and I the remaining dishes. After carefully studying Alton Brown’s Thanksgiving menu, I’ve come to learn that the tasty turkey juices that seep into the thanksgiving stuffing can also seep into your stomach and make you vomit.
Although I emphasize that 161 F is indeed a safe temperature for roasting a turkey, in order for the stuffing to reach the 161, the remaining turkey has to reach high temperatures that would dry the breast and legs out – not good eats. On the other hand, while a meat thermometer might register the meat as cooked, the stuffing may be under the Alton Brown recommended 161 and filled with salmonella juices.

Another note that I have is the fact that this is indeed technically called “dressing” instead of stuffing. But lets be real, with a family that has an heavy asian influence like mine, calling this dressing might actually convince them that I’m serving bread, chestnuts, and bacon with a bowl full of ranch.
Adapted from Foodnetwork.com